Alice 3: Make a biped walk

Alice

There is a nice video on how to create procedures that allow you to make bipeds (i.e. characters with two feet) walk. It is here

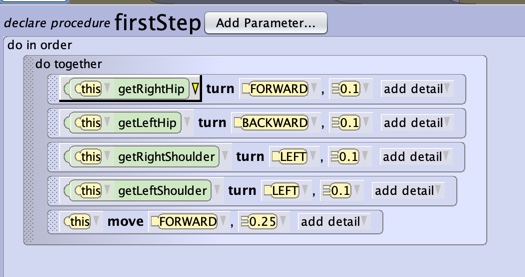
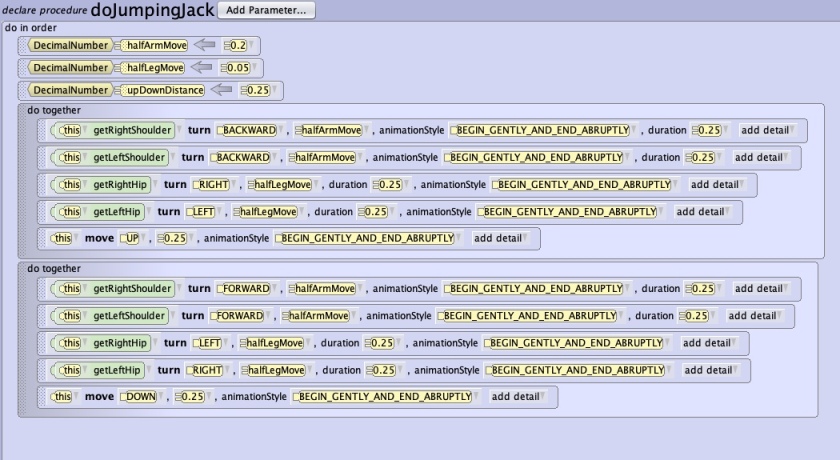
The movement has been separated into two procedures, the first halfstep called “firstStep()”.

181210 Alice firstStep.jpg

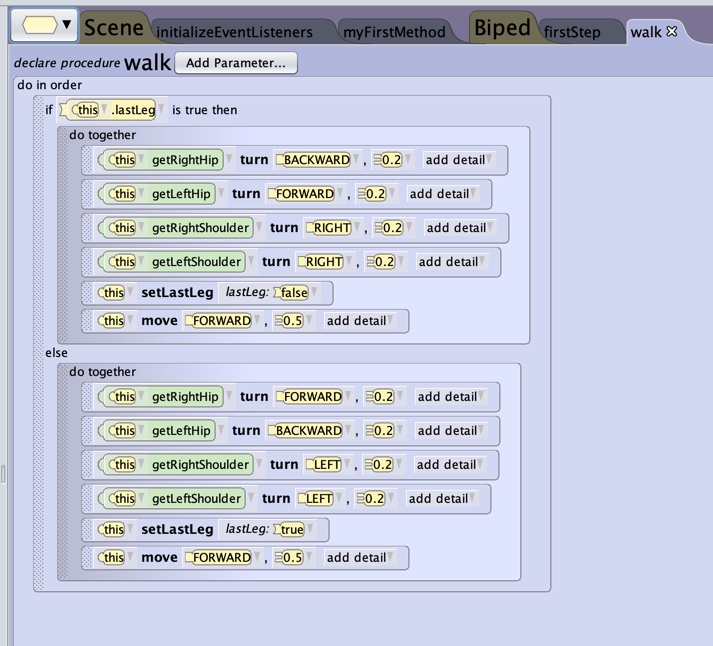
Next we create a procedure for a full step with both legs called “walk()”.

For that we also need to create a Biped property that keeps track of which leg moves last so that next time the other leg moves. You create it also by clicking on the yellow hexagone and choose create Biped property. Here is the requester that comes up with all data you need to fill in. This property only has two values signaling which leg to move next. Values of type Boolean have only two values, they are suitable for this task.

181210 createBipedPropertyLeg.jpg


181210 Alice walk.jpg

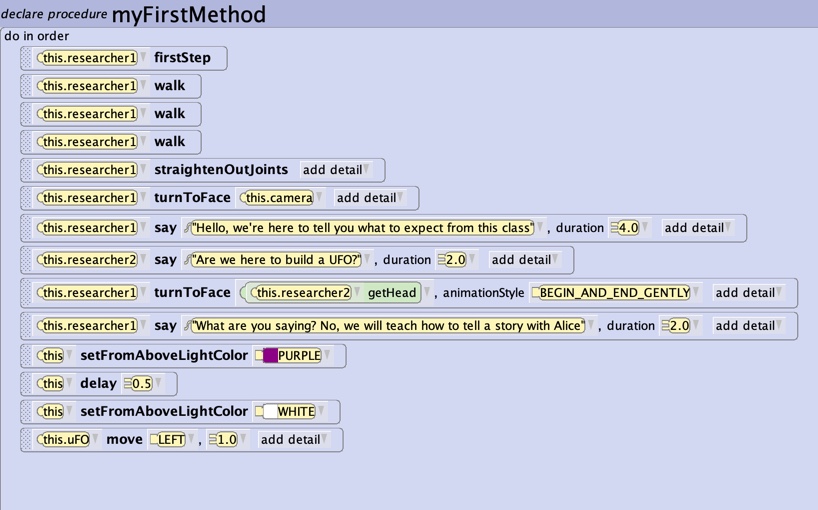
Here are the two procedures used inside “myFirstMethod()”, the rest of the program is for another project, it also contains code to use colour effects.

181210 Alice walkInMyFirstMethod.jpg

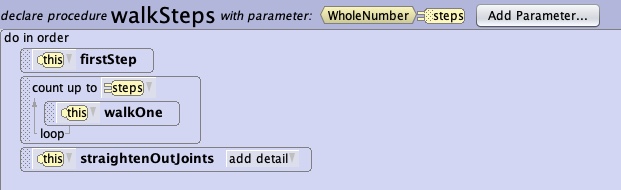
Here is an add-on, it is the function walkSteps(steps). Here steps is a parameter that tells the method how many steps to take.

181211 walkSteps.jpg


Object oriented design elements with classes and their properties and methods as well as inheritance as a way to structure classes.

All sprites and props in Alice are arranged in a class hierarchy.

You have already encountered class hierarchies in biology. They allow animals and plants to be classified by certain criteria in a taxonomy or hierarchy. The criteria go from more generic at the top of the tree (Domain in biology) to more specific at the bottom of the tree (Species in biology). A species shares most of the properties of the respective genus, and has different ones to distinguish itself from other species.

640px-Taxonomic_Rank_Graph.png

Source:

The same concept is applied in the class hierarchie in Alice. Here the more generic classes are called parent classes, a class derived from one parent may be called child class. When you are on the “Setup Scene”, you see all characters and props arranged in classes at the bottom. The class Biped contains humanoids, but also monkeys and other animals, all of them are walking on two legs, at least in Alice. In order to create a biped character on your scene, you select the class Biped, being the parent class, and then define a child class with individual properties as age, clothes, hair, … . The class Biped also provides methods that allow you to let them act that inherited to the child class. Inside the child class you can then define own properties and methods that are only applicable to that particular class.

Inside Alice the class hierarchie can be visualised by clicking on the yellow hexagone beside the Scene Tab in the Code Editor. Here is a screenshot how it may look like. You can see the inhertance structure be the amount of identation, i.e. AdultPerson is a child class of Person that is a child class of Biped.

181210AliceInheritage1.jpg

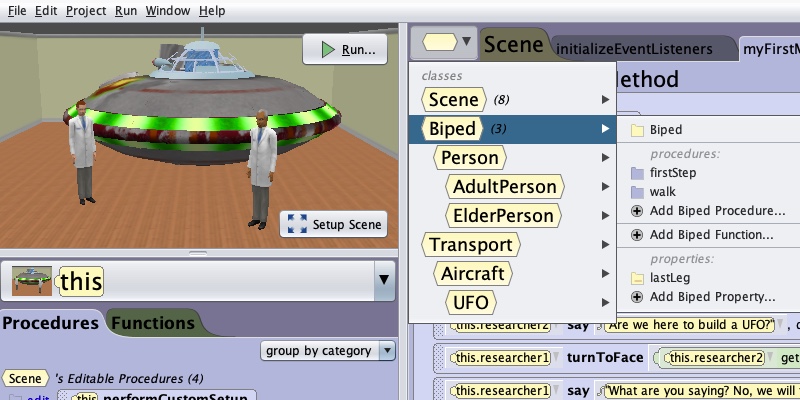
If you want to create a procedure to make a biped walk, you select the Biped class, and then code your procedure. As a result, the procedure is available to all characters that are derived from the biped class, existing ones, but also those you may create in the future.

This is a major characteristic of so called Object Oriented Programming and helps you to structure your work and avoid repetitions of similar properties and methods.

Alice 3: Making a biped talk or sing

Alice

This video revises again the concept of objects and shows you how to create talking person, with sound and movement of the mouth.

Here is a code snippet for this, and a short description on how to create it:

  1. Add it as a procedure to the biped class, so that you can use it for all your bipeds later. For this, go the Code Editor, select the yellow hexagone at the top beside the Scene tab, and then select “Add Biped Procedure” after choosing “Biped”. in the example below the procedure is called “moveMouthToTalk()”.
  2. Next click the “this” biped above the Procedures/Functions tab on the left and by clicking and then hovering select the SBipedJoint mouth. This gives you access to all procedures and functions available for the mouth.
  3. Next drag and drop two turn method blocks on the left under “do in order” and change the parameters as shown in the screenshot below. You are now done with the mouth movements.
  4. That’s it, you have created the moveMouthToTalk procedure. In order to use it, you need to call it from within the myFirstMethod(). Make sure that you select the correct character that you want to sing and use “do in order” and “do together” blocks properly nested.

181210 moveMouthToTalk.jpg


Alice 3: Audio Files in Alice

Alice

181210 AudioInAlice1

When importing audio files into Alice, they should be as small as possible, not exceeding 3.6MB, this value may vary.

There are audio files with music and sounds provided as part of Alice, you can access them by clicking in the menu on “Project” and then select “Resource Manager”. The above panel will pop up, click on “Import Audio” and then browse and select the content you like to have. All these files do not exceed 1.6MB.

You can also import an own music file to Alice. Find a audio file in the internet, make sure that it is legal for you to copy it.  If the file is in mp3 format, you can directly import it into Alice. You just follow the instructions above, locate your audio file as explained before and import it. Try to play the file with the built in audio player, If it is not playing, it most likely exceeds the size limit. Then you need to minimize the size of your audio file with programs as Garageband (Mac) or Audacity (Windows). The best way is normally to reduce the audio compression to a bitrate of 64kBit or 128kBit, both values give you still a sufficient audio quality. You may also shorten the playtime of your song. You can find instructions on how to do change the bitrate with the search term “compress audio audicity” or “compress audio Garageband”.

If you are curious to learn more about audio quality and compression algorithms, have a look here.

Alice 3: Jumping Jack with Variables

Alice

181217AliceJumpingJackScene.jpg

A variable is a sort of container that holds a value, a string (characters or text), a number or other object references. You can create a value by clicking and dragging on the variable tab at the bottom of the code panel. Then a small window will pop up that allows you to define its type (decimal, integer, text, …), set an initial value and give it a name.

Next time you are assembling a procedure in the code editor, and this procedure also requires parameters (values), matching variables will be suggested in addition to the fixed values you have used so far.

181217AliceJumpingJackCode.jpg